My wife and I lived in an RV from late 2018 to late 2021. We also worked remotely and required reliable internet. Being a bit of a tinkerer, I also had a strong desire to have some type of LAN without spending a ridiculous amount of money or mounting anything to our roof.
This post explains our internet connectivity setup, which is one of the common questions we receive when we tell people about our RV adventures.
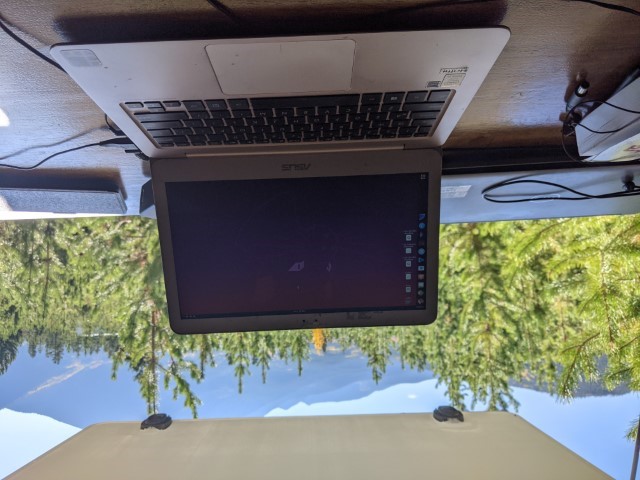
Above: occasionally, I would luck out with an amazing view from my desk like this picture taken in Breckenridge.
When you live on the road, dedicated hotspot devices are a reasonable option for internet. This also gives you the opportunity to “diversify” your portfolio of telecom companies you’re relying on. You never know which company’s cell towers you’ll be near at any given time (tools like cell mapper do come in handy though). The issue with these devices is that they don’t provide any LAN capabilities directly - this post describes a work-around for that.
By the end of our RV journey, we had accumulated the following internet options:
- Verizon Jetpack hotspot device (15 GB plan)
- Cricket (AT&T towers) Moxee MiFi hotspot device (100 GB plan)
- Metro PCS (T-Mobile) hotspot from my personal cell phone (20 GB) - generally a “last resort” device
The Verizon Jetpack was the most expensive in terms of $ per GB, but it also had the best reception. Our default “daily driver” was the Cricket Moxee device, which surprisingly worked well in most locations and was very affordable relative to the Verizon plan.
The Result
Here’s a look at my final mobile “homelab” setup in our RV. There was also a raspberry pi attached to the wall under the desk as well.
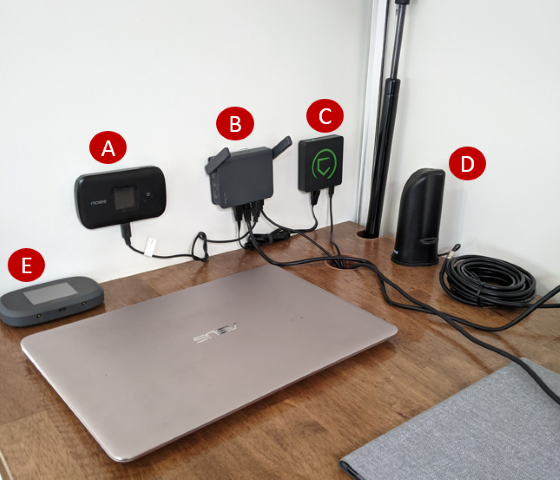
- A: Cricket Moxee hotspot
- B: GL-AR750S-Ext router, affectionately referred to as “tiny router”
- C: Hubitat device for Z-wave and Zigbee sensors and home automation devices
- (It’s upside-down because I wanted the cables to connect to the bottom…)
- D: WeBoost Drive Reach RV indoor antenna
- (The outdoor antenna we mounted to a 25-foot retractable flag pole for maximum signal boosting; more on that later)
- E: Verizon Jetpack hotspot (more expensive and less GB, so these were our “last resort” GBs)
Industrial strength velcro / hook-and-loop is what keeps everything attached to the walls.
Overall, this setup worked great and we very rarely ran into connectivity issues. I also had a platform for home automation that doesn’t require cloud connectivity in the Hubitat device. And the tiny router provided me with a true LAN to start tinkering with my homelab.
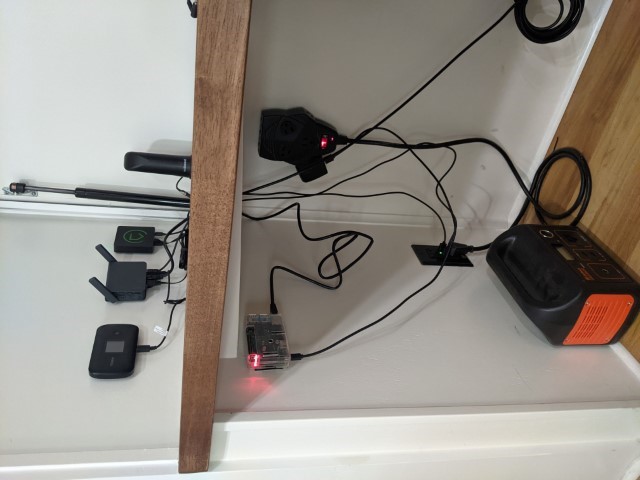
For the sake of completeness, here’s an image of the entire system. Please ignore the (lack of) cable management! We also had three large (I forget the Wattage) solar panels on our roof that kept our house batteries topped off. But in the event of unusually cloudy days or tree cover, we also had a Jackery solar generator battery.
The Journey
To be honest, I had absolutely no idea what I was doing when I set out to build this little mobile network environment. I started out with an idea and a sketch, but I didn’t even really know if what I sketched even made sense at all.
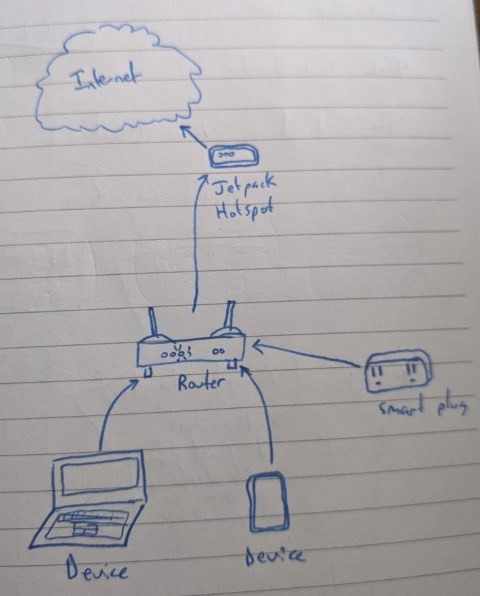
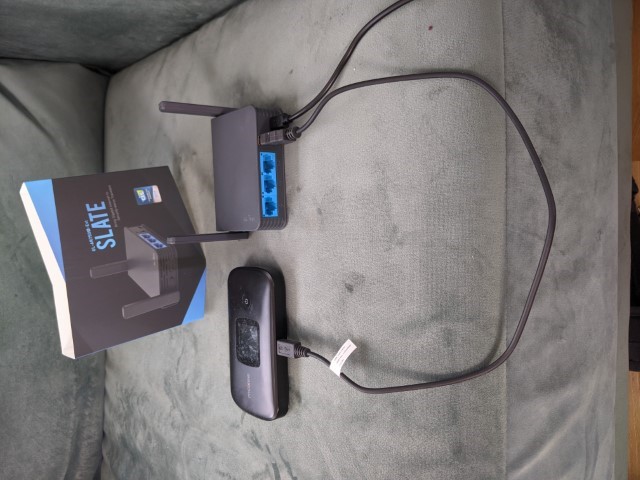
The missing piece that really brought everything together came down to finding a router that supports “USB Tethering.” This means that the router itself is able to gain internet access by plugging a hotspot device into its USB port (see below image).
As an added benefit, I can have my wife connect her devices to the router instead of directly to the hotspot. The days of “hey babe, we’re low on Moxee GBs, can you switch over to the Jetpack” were over. This setup enabled me to optimize our data usage strategy behind the scenes.
Signal Boosting
Eventually, we started boondocking on BLM land instead of always relying on RV parks. This meant that sometimes we couldn’t pick up a strong signal from our hot spot devices. This issue led to us investing in the WeBoost RV Drive Reach.
Our RV didn’t have a built-in ladder, which limited our options for a permanent WeBoost installation. Also, I wanted the option to raise our WeBoost antenna significantly higher than just the roof of the RV to maximize its signal-boosting capabilities.
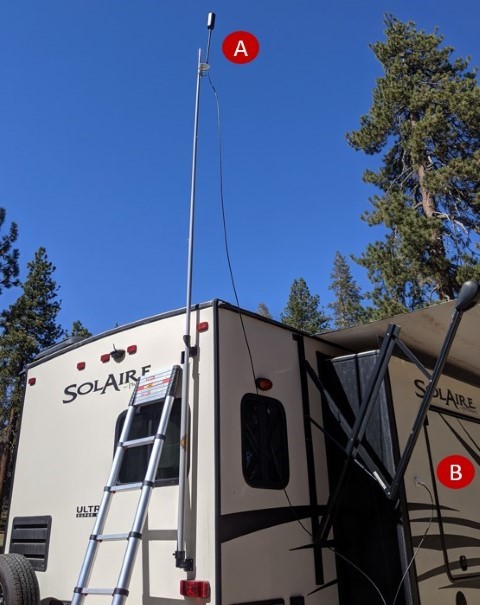
- A: WeBoost outdoor antenna mounted to a 25-foot retractable RV flag pole
- B: I drilled a hole in the exterior of the RV and installed this wire port. The wire fed into our pantry which was conveniently right next to the desk where our internal antenna was positioned. (I’m not very handy, so I was extremely proud of this part lol)
When needed, it only took about three minutes to deploy our flag pole signal booster solution. It often made a huge difference in connectivity as well, especially while boondocking!