Why?
One common tool I interact with is nginx. It’s a critical component of nearly every web-related thing I do, including this blog. Aside from the sometimes confusing configuration settings, nginx is a solid piece of software that is (usually) a pleasure to work with.
I completed Duke’s C Specialization on Coursera in late 2020 and have been looking for an excuse to look into real C code in the wild. One thing I really enjoyed about this course is how early they introduced the gdb debugger. Debuggers are a great way to read a code-base as it’s executing - much better than printf() all over the place.
The main goal here is to step through the code nginx is executing as it responds to a http request. I won’t actually be discussing the code here, just setting up the debugging steps. I’d like to revisit this post at some point in the future to actually look into the code.
Reproducibility
Below are the versions of the tools I’m using.
- OS: Ubuntu 20.04 LTS (running in VirtualBox 6.1.26 r145957)
- nginx version: nginx release 1.21.3
- github code tree at this commit
- compiler: gcc (Ubuntu 9.3.0-17ubuntu1~20.04) 9.3.0
- debugger: GNU gdb (Ubuntu 9.2-0ubuntu1~20.04) 9.2
- Make: GNU Make 4.2.1
Other pre-req installs:
sudo apt install libpcre3 libpcre3-dev- nginx relies heavily on regex, I believe these are related to regex.sudo apt install zlib1g-dev- nginx also uses gzip which requires zlib.
Download and compile code
-
I downloaded a zip of this version of nginx, then unzip that using the
unzipcommand. -
Execute the following command from within the nginx dir you just unzipped:
./auto/configure --with-debug --with-cc-opt='-O0 -g'-O0sets the optimization level to zero, or no optimization.- To quote the gcc man page: “The shortcuts taken by optimized code may occasionally be surprising: some variables you declared may not exist at all; flow of control may briefly move where you did not expect it; some statements may not be executed because they compute constant results or their values are already at hand; some statements may execute in different places because they have been moved out of loops.” My goal here is to step through the code as it was written - not as it was optimized by gcc.
-gproduces “debugging information in the operating system’s native format” which GDB can use
-
Now
makeitsudo makesudo make install
-
the debuggable executable for nginx now exists at
/usr/local/nginx/sbin/nginx
Master vs Worker Processes
At this point, it becomes critical to understand the different types of processes nginx uses. There is only one master process. If you just run sudo gdb /usr/local/nginx/sbin/nginx and attempt to debug, you’ll eventually run into a message like Detaching after fork from child process 21152. What happened here is we were debugging the master process, but then a child process (worker) got created. gdb must pick which process to follow.
Let’s see what the nginx documentation has to say about these processes:
nginx has one master process and several worker processes. The main purpose of the master process is to read and evaluate configuration, and maintain worker processes. Worker processes do actual processing of requests.
Now we need a way to tell gdb to follow the newly created child process.
gdb: follow the child process
once again, execute sudo gdb ./usr/local/nginx/sbin/nginx, then follow these steps (within the context of gdb):
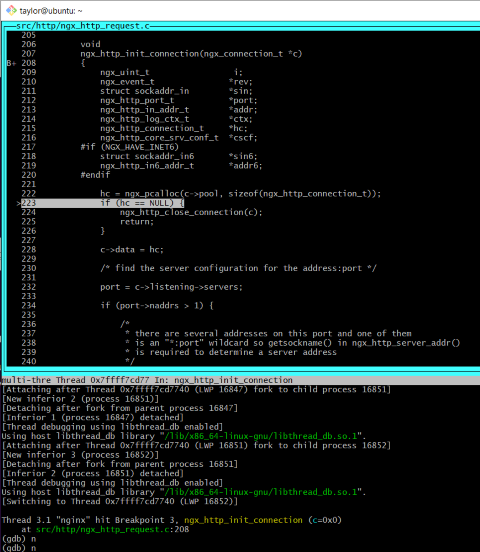
layout src- so we can see the codeb main- just set the breakpoint atmainfor nowstart- to begin debuggingset follow-fork-mode child- this is the key difference here, now we’ll follow child processesb ngx_http_init_connection(I believe this to be one of the first functions executed within the context of responding to an http request, just based on the name)continue- you should get to a point where nginx is just sitting, waiting for something to respond to- at this point, you may also get a bunch of warnings that port 80 is already in use. Be sure to turn off nginx if it’s installed on your server (
sudo systemctl stop nginx) and kill any other nginx-related processes from prior attempts at debugging.
- at this point, you may also get a bunch of warnings that port 80 is already in use. Be sure to turn off nginx if it’s installed on your server (
- Finally, send an http request to this running instance of nginx. I’m using VirtualBox for my ubuntu server with port forwarding for port 80. This means I can simply visit “localhost” in my browser to trigger the breakpoint in my gdb session of nginx. You could also use
curlfrom another shell on the same machine running nginx.
Below, you can see the source of the ngx_http_init_connection function I set my breakpoint for.