The Problem
My wife thinks that the main bedroom in our two bedroom apartment is consistently the coldest room in our place. I set out to (over) engineer a solution to collect the data to determine if she’s right or not.
The Goal
I want to capture temperature data from local sensors placed throughout my apartment. Ideally, this data will be stored on a device on my LAN as well as somewhere on the cloud. Eventually, I’d like a front-end GUI to display this data, but for now, I’m only interested in building out the back-end data collection portion of the project.
The Architecture
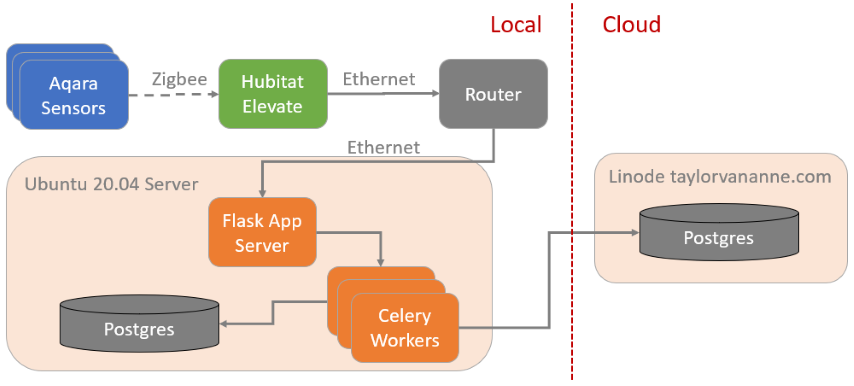
- Temperature data collected by Aqara devices and passed over Zigbee wireless protocol into my Hubitat
- Hubitat Maker API is configured to send all Aqara device data to my Flask endpoint running on my local Ubuntu server (Hubitat and Ubuntu server are both hard-wired to my home router)
- Flask executes some simple data clean-up and filtering, then passes data to Celery workers
- Celery tasks push data to both my local Postgres database as well as a cloud Postgres database
As far as side projects are concerned, I’ll go to some fairly unreasonable lengths to avoid vendor lock-in. One of the worst industries for vendor lock-in, in my opinion, is the home automation industry. In general, you must select a vendor for your “hub” that connects to all of your sensors, light bulbs, and all other “smart” devices so you can control them from your phone.
There is, however, another option. If you’re willing to tinker with some community-developed Groovy (JVM) scripts, then the Hubitat is a great option. It’s designed to work entirely on your LAN, unless you opt-in to cloud functionality. It also intends to bridge the gap between multiple smart device / home-automation vendors.
The Code
While the code is relatively straight forward, there are several files that make up my codebase for this solution I’ve built:
LAN_forwarder.py: Python Flask app that handles inbound POST requests from my Hubitat deviceFlask.dockerfile: Dockerfile to build my Flask app
my_celery_app.py: Python Celery app that houses the basic configuration for my Celery task queuetasks.py: the Celery tasks I’ve defined for my projectCelery.dockerfile: Dockerfile to build my Celery app
docker-compose.yml: docker compose file so all of my docker containers are networked together by defaultsecrets.json: where I’m storing database password informationrequirements.txt: for my Python dependencies (primarily for building out my docker containers)
# LAN_forwarder.py

from tasks import load_sensor
from flask import Flask, request
from dateutil import tz
import logging
import json
from datetime import datetime

MEASUREMENTS = ['temperature', 'humidity', 'pressure', 'lastCheckin']

logging.basicConfig(
    filename="LAN_forwarder.log",
    format='[%(asctime)s.%(msecs)03d][%(levelname)s] %(message)s',
    level=logging.DEBUG,
    datefmt='%Y-%m-%d %H:%M:%S')


def make_time_fields():

    # make datetime timestamps
    utc = datetime.now(tz.UTC)
    mtn = utc.astimezone(tz.gettz('America/Chihuahua'))

    # create desired strings - all derived from the same original timestamp
    utc_ts = str(utc)[0:26]         # remove timezone info
    mtn_ts = str(mtn)[0:26]
    mtn_date = str(mtn.date())      # ISO 8601 YYYY-MM-DD
    mtn_time = str(mtn.time())[0:8] # I only want HH:MM:SS, no milli or micro seconds

    return utc_ts, mtn_ts, mtn_date, mtn_time


def all_valid(*args):
    """
    Are any of these args None? I want to accept
    empty strings and integer values of zero as
    valid values.

    #Example:
        print(all_valid(1, 3, 0, ''))  # True
        print(all_valid(1, None, 9))   # False

    # why not use `all()`?
    >>> all([True, True, 0])
    False
    # ^ That's why.
    # Still not sure if there's a better way though.
    """

    for arg in args:
        if arg is None:
            return False

    return True


app = Flask(__name__)


# troubleshooting firewall and general networking - I like to
# just get a quick visual indication my container is running.
@app.route("/hello", methods=['GET'])
def hello():
    print("I ran the 'hello' route!")
    return '<p>Hello, World!</p>'


# main sensor data forwarder
@app.route("/sensor", methods=['POST'])
def receive_sensor_data():

    # extract JSON into dict
    content_raw = request.json
    content = content_raw.get('content')

    # stop if JSON is not formatted according to our assumptions
    if not content:
        raw_json_string = json.dumps(content)
        logging.warning(f"Improper JSON format: {raw_json_string}")
        return '200'

    # choosing consistency over Python style guidelines
    displayName = content.get("displayName")
    name = content.get("name")
    value = content.get("value")
    unit = content.get("unit")
    deviceId = content.get("deviceId")

    # quick patch for "lastCheckin" units (so we actually record those...)
    if name == "lastCheckin":
        unit = "timestamp"

    if not name:
        raw_json_string = json.dumps(content)
        logging.warning(f"No 'name' field in JSON payload: {raw_json_string}")

    # filter to only the measurements we're interested in
    if not name in MEASUREMENTS:
        raw_json_string = json.dumps(content)
        logging.info(f"Not a measurement we're interested in: {raw_json_string}")
        return '200'

    # stop if JSON is not formatted according to our assumptions
    if not all_valid(displayName, name, value, unit, deviceId):
        raw_json_string = json.dumps(content)
        logging.warning(f"Improper JSON format: {raw_json_string}")
        return '200'

    # preprocess sensor data
    del content['descriptionText']
    del content['type']
    del content['data']
    utc_ts, mtn_ts, mtn_date, mtn_time = make_time_fields()
    content['utc_LAN_received'] = utc_ts
    content['utc_cloud_insertion'] = utc_ts
    content['mtn_date'] = mtn_date
    content['mtn_time'] = mtn_time

    # load sensor data
    print("calling load_sensor.delay(content)...")
    load_sensor.delay(content)
    print("done.")
    return '200'


if __name__ == "__main__":

    # gunicorn command to run the server:
    # gunicorn --bind 0.0.0.0:5000 LAN_forwarder:app

    # run flask development server while testing
    app.run(host='0.0.0.0', port=5000, debug=True)
The /sensor route is the main one we care about. This route receives data from the Hubitat Maker API.
You select devices on the Maker API to access those devices through API requests. Additionally, you can configure the Maker API to forward (POST) all sensor data to a specific URL endpoint. That’s the option I went with and I’ve set up my /sensor route to receive this POSTed data from the Hubitat.
Also, Flask is single threaded. I’m looking to use this web server to write data to two databases: one local and one in the cloud. I’d like to future proof this app at least a little bit. So I’m going to use a Celery task to execute the database writes. That will increase the rate of requests my Flask web app is able to handle, just in case I buy more sensors/devices some day.
Below is the docker file to run my flask app.
# Flask.dockerfile
FROM python:3.9
COPY LAN_forwarder.py LAN_forwarder.py
COPY my_celery_app.py my_celery_app.py
COPY tasks.py tasks.py
COPY requirements.txt requirements.txt
COPY secrets.json secrets.json
RUN pip install -r requirements.txt
EXPOSE 5000
CMD ["gunicorn", "--bind", "0.0.0.0:5000", "LAN_forwarder:app"]
My celery app is quite simple. I name it, provide a URL to my message broker, and let it know which file to load tasks from (tasks.py, in this case). We’ll look at those tasks shortly.
# my_celery_app.py

from celery import Celery

app = Celery(
    'my_celery',
    broker='amqp://localhost',
    include=['tasks']
)
Below is the dockerfile to run the Celery app. For simplicity, I’m using the same requirements.txt file for both of my containers. I’m using eventlet because it’s better for IO-bound tasks. If these were compute-bound tasks, I would let Celery use the prefork default pool type. More on using the eventlet pool and configuring workers in general.
And I wrap my celery app in a dockerfile as well. One thing to note, I’m not 100% sure what number of processes or workers this defaults to. Even if it’s just one worker, that is plenty for what I need. And if it’s more than one worker, then I’m sure it’s a sensible default number, like the number of cores on the machine.
# Celery.dockerfile
FROM python:3.9
COPY tasks.py tasks.py
COPY my_celery_app.py my_celery_app.py
COPY requirements.txt requirements.txt
COPY secrets.json secrets.json
RUN pip install -r requirements.txt
CMD ["celery", "-A", "my_celery_app", "worker", "--pool=eventlet", "--loglevel=INFO"]
And finally, below are my Celery tasks. This is the logic that is sent to each of my Celery workers when they’re created.
# tasks.py

from my_celery_app import app
from celery.signals import worker_init
from sqlalchemy import create_engine, text
import json


@app.task
def load_sensor(data_dict):
    print("Loading sensor data")

    with eng_local.begin() as conn:
        conn.execute(
            text("""INSERT INTO boulder.sensor (
                        displayName, name, value, unit, deviceId,
                        utc_LAN_received, utc_cloud_insertion,
                        mtn_date, mtn_time)
                    VALUES (
                        :displayName, :name,
                        :value, :unit, :deviceId,
                        :utc_LAN_received, :utc_cloud_insertion,
                        :mtn_date, :mtn_time
                    )"""),
                    data_dict
        )

    with eng_cloud.begin() as conn:
        conn.execute(
            text("""INSERT INTO boulder.sensor (
                        displayName, name, value, unit, deviceId,
                        utc_LAN_received, utc_cloud_insertion,
                        mtn_date, mtn_time)
                    VALUES (
                        :displayName, :name,
                        :value, :unit, :deviceId,
                        :utc_LAN_received, :utc_cloud_insertion,
                        :mtn_date, :mtn_time
                    )"""),
                    data_dict
        )


@app.task
def retry_failed_records():
    # TODO: if I feel like this is necessary...
    pass


# Every worker that gets created will have access to
# the objects created in this function.
@worker_init.connect
def make_sqlalchemy_engines(**kwargs):

    with open('secrets.json', 'r') as f:
        secrets = json.load(f)

    pw_cloud = secrets["cloud_pw"]
    global eng_cloud
    eng_cloud = create_engine(f"postgresql+psycopg2://taylor:{pw_cloud}@taylorvananne.com:5432/taylor?sslmode=require",
        executemany_mode='values_only',
        echo=True,
        future=True
    )

    pw_local = secrets["local_pw"]
    global eng_local
    eng_local = create_engine(f"postgresql+psycopg2://taylor:{pw_local}@localhost:5432/taylor?sslmode=require",
        executemany_mode='values_only',
        echo=True,
        future=True
    )


# This currently does nothing. I'm thinking I'll add a timed task to retry
# sending records to the cloud, in case of failure.
@app.on_after_finalize.connect
def setup_periodic_tasks(sender, **kwargs):
    sender.add_periodic_task(5.0 * 60.0, retry_failed_records.s())
I remember having difficulty thinking through how I should connect to my local and cloud databases from a Celery worker. I was thinking I’d have to connect to the database for every Celery worker task I executed.
Then I found the @worker_init.connect decorator in the docs, which executes a block of code upon initialization of every worker. This seemed perfect to me for creating (and subsequently, reusing) database connections across multiple task executions.
I also read about configuring periodic tasks in Celery. Part of the reason I write to both a local and a cloud database is to reduce the risk of missing any data collection. If I lose my internet connection, I’ll still be writing to the local database. I’m thinking I’ll eventually set up a periodic task to send any failed records. So far, I only have the stub for that function written.
The Deployment
I’m a simple man. You better believe I’m scping this bad boy onto my LAN Ubuntu Server (aka, an old ASUS Zenbook laptop from ~2015). To bring it all home, I ship a docker-compose.yml file with my code.
version: "3.4"
services:

  # "network_mode: host" is important so I can communicate with
  # the postgresql server on the host machine

  flask:
    build:
      context: .
      dockerfile: Flask.dockerfile
    ports:
      - 5000:5000
    network_mode: host

  celery_worker:
    build:
      context: .
      dockerfile: Celery.dockerfile
    network_mode: host
    environment:
      rabbitmq_uri: amqp://127.0.0.1:5672
    depends_on:
      - rabbitmq_server

  rabbitmq_server:
    image: rabbitmq:3.9.12
    ports:
      - 5672:5672
And to spin up my solution, I execute this command:
taylor@zenbook:~/home_sensors$ sudo docker-compose up -d

# I may throw a --build in there as well every once in a while
# to make sure any dockerfile changes make their way to my build.
Feb 3, 2022 Update: Visualization and Enable as Linux Service
An update on data collection: As soon as I had deployed, I wished I had made my docker-compose script a systemd service enabled to start at boot. See that long stretch of perfectly horizontal lines around February 2 on my chart below? My docker-compose instance of containers went down and I didn’t notice. It’s time to wrap this in a systemd service and enable it.
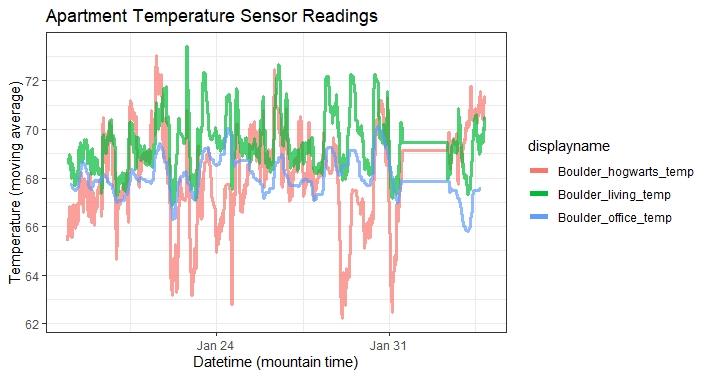
I don’t really like the term “master” bedroom (much like how github doesn’t like “master” branches). I asked my wife what she wanted the bedroom to be called - she said “Hogwarts” - and that was that.
So here’s my service file (at this filepath taylor@zenbook:~$ cat /etc/systemd/system/home-sensor-docker.service
). I mostly based this file on this stack overflow post. My docker
is installed with snap, so I’m still trying to figure out how to get Requires=docker.service working. It seems
the snap version of docker doesn’t have the docker.service service. I’ll leave it for now, but I might reinstall
docker without using snap if I can’t figure it out.
[Unit]
Description=Docker Compose for Home Apartment Sensor Project
#Requires=docker.service
#After=docker.service

[Service]
Type=oneshot
RemainAfterExit=yes
WorkingDirectory=/home/taylor/home_sensors
ExecStart=/usr/local/bin/docker-compose up -d
ExecStop=/usr/local/bin/docker-compose down
TimeoutStartSec=0

[Install]
WantedBy=multi-user.target
R Script to Generate the Plot
And finally, below is the R script I used to generate the plot above. The combination of dplyr and
the pipe operator%>% are definitely my favorite way to work with data. Especially when
doing some quick, exploratory work.
library(RPostgres)
library(DBI)
library(ggplot2)
library(dplyr)
library(lubridate)
library(plotly)
library(zoo)


# connect to database - the one on my LAN in this case
con <- dbConnect(drv=Postgres(), dbname="taylor", host="10.0.0.10",
                 port=5432, user="taylor", password="")


# query for our data
df_query <- RPostgres::dbSendQuery(con, "SELECT * FROM boulder.sensor")
df <- dbFetch(df_query)
df$mtn_datetime <- lubridate::ymd_hms(paste0(df$mtn_date, " ", df$mtn_time))


# filter to just temp
dftemp <- df %>% filter(grepl("F", df$unit))


# filter out bad sensor readings, apply a moving average
dftemp <- dftemp %>%
  filter(value > 40) %>%
  group_by(displayname) %>%
  arrange(utc_lan_received) %>%
  mutate(
    temp_ma = zoo::rollmean(value, k=10, NA)
  )


# visualize
gg <- ggplot(dftemp, aes(x=mtn_datetime, y=temp_ma, color=displayname)) +
  geom_step(size=1.1, alpha=0.7) +
  theme_bw()  +
  ggtitle("Apartment Temperature Sensor Readings") +
  labs(x="Datetime (mountain time)", y="Temperature (moving average)") +
  # below, I'm modifying the legend slightly to make it more readable
  guides(color = guide_legend(override.aes = list(size=2, alpha=1)))
gg


# plotly vis for fun and interactive exploration
plotly::ggplotly(gg)